 Add a Time Entry
Add a Time Entry1. From a Time
Entry list, click New on the Taskbar. Or from
any module, select New > Time
Entry from the pull-down menu on the Taskbar.
Or select an item in a list (a File, Appointment, Task, or Phone Call)
and click Do Time Entry on the Taskbar. Or in
an item's details dialog, click Do Time Entry.
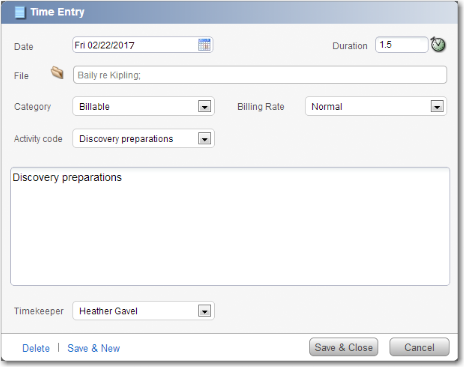
2. Depending on
where you have initiated your Time Entry from, some or all fields will
be auto-filled by Amicus. For example, the File from the underlying item,
which in turn will determine the Category and Rate.
Edit details as desired: date, duration, etc.
o File
§ If you need to assign a File, start typing the File name, select from the match list that appears. Or, click the File icon to display the Select Files window and select one or more Files, you can filter and search the list to help you find the appropriate File.
o Activity/Task Code
§ If you associate the Time Entry with a File set for Task-Based Billing, an additional field appears where you can select a Task-Based Billing Code (e.g. L101), and the Activity Code list will be filtered to the Task-Based Activity Codes.
§ Otherwise, the Activity Code list includes all regular Activity Codes, and the Task code field will not be visible.
3. Click Save & Close.

Tips:
● The Billing Behavior attribute in Time Entries (if your firm has Amicus Attorney Billing) is not editable from Amicus Anywhere, but will be automatically set when you create a new Time Entry. It is set to No Charge - Don't Show if the Category you assign is Contingency, Fixed Fee, Non-Billable, Personal, or Vacation—otherwise it is set to Bill.
● To post a Time Entry, change its association from one File to another, or change its Activity Code from one value to another, use your Amicus desktop application.
Amicus Anywhere Help (March 2019)
